You have no items in your shopping cart.
Erecting a net is fairly straight forward and the only requirement is that the horizontal live wires do not touch the ground or come into contact with vegetation. The bottom wire is not live so may come into contact with the ground. Many Electric Poultry netting problems may be solved by simple observation and attention to detail.
1. Site preparation
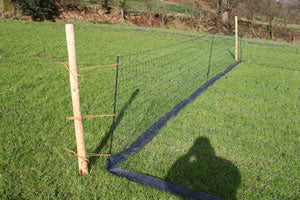
Carry roll(s) of net to proposed fence line. Prepare line by either spraying with Glyphosate or mowing all vegetation over 4 inches tall. This creates a clean path for the fence. A very sound idea is to lay a strip of builders damp-proofing (DPC) or plastic beneath the net (as shown in the photo.) This prevents grass growing up and touching the twine and makes maintenance a lot easier. It is such a simple solution to a major problem with nets. One other tip for when the grass starts to take off in summer - use a strimmer with a blade on to get right in close to the membrane, once you get used to it, you can just tuck the blade under the DPC and carefully walk along the fence line taking out all the excess grass.
2. Untying the roll of netting
Untie the 2 tie strings and pull apart the 2 metal clips to release the roll of net.
3. Unrolling the net
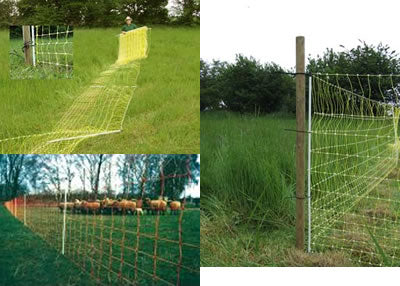
Grip all the posts as a group and lift them up in front of you. This allows the netting to unroll in front of you in a series of folded “pleats,” each attached to the posts in your hands. Lay unrolled pleats on the ground. Locate the beginning post. (It’s the post with 2 tie strings attached and a steel connector at the top.
4. Inserting the first post
 Insert the beginning post into the soil beside a stronger support post or an existing fence. The plastic posts are great for the in-line posts but will bend under tension. Use the 2 tie strings to secure the first post to the support post or fence. Keep the net end post(s) at least 2" away from anything that is conductive (metal, wood, concrete)
5. Unfolding the net
Grip all remaining posts as a group and lift them up in front of you. Then walk backwards along the intended fence line, dropping each post as it’s pulled from your hands, thereby unfolding the netting. To reduce the risk of tangling the netting, try to drop or toss each post in sequence, helping to free it from the other posts you are still holding. Unfold entire roll of netting along the fence line.
6. Installing line posts
Starting at the first post, walk along fence line, picking up each post in turn and pushing it into the ground. Apply only enough sideways tension to each post to keep the netting erect and straight. A trick is to use your boot to pull against the stake until you feel quite a bit of tension and the bottom wire is pulled taught. Stretch netting just tight enough to stand up well. If there are changes in terrain then this must be catered for whilst tensioning the fence by using pegs to pull the bottom strand into the hollows.
7. Joining 2 rolls of standard net
Start the second roll by placing its first end post next to the last end post of the first net. Use the 2 tie strings to tie them together.
8. Joining 2 rolls electrically
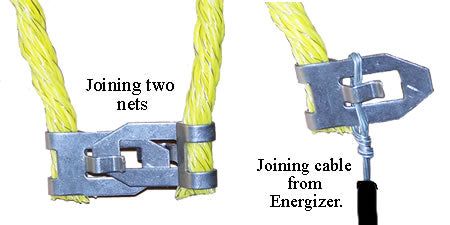
 To join one roll of standard netting to the next to provide an electrical connection, simply slide the built-in, stainless-steel male/female “power” connectors together by hand at one end. Do not use pliers to force them. The 2 pieces of metal only need to make and maintain contact.
10. Connect energizer to standard net
For either a battery (DC) or plug-in (AC mains) energizer, attach the lead wire from the fence terminal on energizer top clip at one end of the net as shown in the image.
11. Checking voltage
Never put animals into an electric fence enclosure without first checking it for adequate voltage with an electric fence tester. Touch one contact point to the soil or metal spike of the end post and the other contact point to the clip at the end of the fence. Voltage on a newly installed fence should exceed 4,000v. As time passes, grass or weeds will grow and touch the fence, causing the voltage to drop. Never allow it to drop below 2,000v


← Older Post Newer Post →
0 comments