You have no items in your shopping cart.
How to Erect a Net
Tips and suggestions on how to get the best out of your Electric Net.
Erecting a net is fairly straight forward and the only requirement is that the horizontal live wires do not touch the ground or come into contact with vegetation. The bottom wire is not live so may come into contact with the ground. The second bottom wire IS LIVE so must be kept off the ground. Many Electric netting problems may be solved by simple observation and attention to detail.
1. SITE PREPARATION
Carry the roll(s) of net to proposed fence line. Prepare line by flattening or mowing all vegetation over 4 inches tall. Any user will find placing a length of builders damp course below the fence helps with grass growth and reduces fence maintenance considerably.
2. UNTYING THE ROLL OF NETTING
Untie the 2 tie strings and pull apart the 2 metal clips to release the roll of net. Do not unroll it yet.3. UNROLLING THE NET
Grip all the posts as a group and lift them up in front of you. This allows the netting to unroll in front of you in a series of folded “pleats,” each attached to the posts in your hands. Lay unrolled pleats on the ground. Locate the beginning post. (It’s the post with 2 tie strings attached and a stainless-steel connector at the top.4. INSERTING THE FIRST POST
 Insert the beginning post into the soil beside a stronger support post (either a stiffer Ultimate Horse Post, the Metal Corner Posts, a wall, a tree or an existing fence - anything to give it support. Use the 2 tie strings to secure the first post to the support post or fence. A support post will be required at the corners. Keep the support post at least 50 mm/2 in away from anything that is conductive (metal, wood, concrete).
Plastic posts supplied with the net are great in a straight line but when tension is applied in un-even directions they WILL bend. Particularly in hot weather. Nets are not designed to go round in a circle and the corners need support. These support posts will allow you to apply considerable tension on the net so that they do not sag, do not be scared of pulling too hard - you will not tear the net.
An alternative to stiffer posts is to use guy ropes in the corners. The net is supplied with tie strings that may be used for this or any other non-conducting material may be employed, (not wire or electrified twine)
5. UNFOLDING THE NET
Grip all remaining posts as a group and lift them up in front of you. Then walk backwards along the intended fence line, “feeding out” each post as it’s pulled from your hands, thereby unfolding the netting. To reduce the risk of tangling the netting, try to drop or toss each post in sequence, helping to free it from the other posts you are still holding. Unfold entire roll of netting along the fence line.
6. INSTALLING LINE POSTS
Starting at the first post, walk along fence line, picking up each post in turn and pushing it into the ground. Apply only enough sideways tension to each post to keep the netting erect and straight. Stretch netting just tight enough to stand up well. It may be necessary to move a plastic post so that it lines up with a corner, these may be un-clipped from the netting and re-inserted where it may be required.
The fence needs to follow the topography of the ground and only the bottom wire - which is not energised - may touch the ground. A post is best situated in a hollow and a summit to follow the ground. It may be necessary to move the posts to achieve this and they may be easily unclipped and re-inserted where necessary.
7. JOINING 2 ROLLS OF STANDARD NET
Start the second roll by placing its first end post next to the last end post of the first net. Use the 2 tie strings to tie them together. There is no need to insert a support post if the nets are continuing on a straight run.8. JOINING 2 ROLLS ELECTRICALLY
To join one roll of standard netting to the next to provide an electrical connection, simply slide the built-in, stainless-steel male/female “power” connectors together by hand at one end. Do not use pliers to force them. The 2 pieces of metal only need to make and maintain contact.
9. ENDS, CORNERS AND CURVES
Use stiffer posts to provide extra support at the ends and corners. More support may be needed depending on the type of netting, terrain and shape of the enclosure.
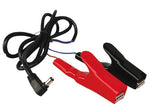
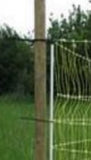
10. CONNECTING THE ENERGISER TO A NET.
For either a battery (DC) or plug-in (AC) energiser, attach the lead wire from the fence terminal on energiser top clip at one end of the net (see above image). Attach the ground wire from the ground terminal on the energiser to the ground-rod system.
Tips to maximise the efficiency of an electric net;-
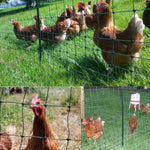
1/. Keep the hen house in the centre of the fenced area, not close to the perimeter. This will lower the degree of temptation for the fox, by keeping it as far as possible from the house.
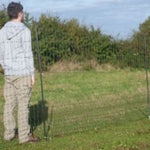
2/. The fence must be pulled tight using the support posts at each corner, don't be shy - they will accept a lot of tension so it does not sag.
3/. Check the power in the fence every evening.
4/. The power must be left on at night, as this is generally when the fox will test the fence for a power failure.
5/. No grass or foliage should touch the fence, as this will cause a ‘short’. Lay a strip of weed proofing under the net to reduce the grass growing up. This helps maintenance a lot.
6/. The fence should be kept away from overhanging trees, hedges, or fences.


Laying a strip of Weed Suppression beneath the bottom line will reduce the maintenance requirement a lot. There are two big benefits,
- Prevents the growth of grass and weeds up into the net which reduces the available current in the net.
- Manufactured from Recycled Low density Polyethylene- in itself an insulator that reduces the possible leaking of valuable power from the net.

An alternative way of keeping the corners taut is to use a guy rope at each corner as shown in this picture. Ensure that you use non-conductive materials. Plastic string or fishing line is ideal. In wet weather the strands in the guy rope will fill with water and this is a good conductor of electricity.

Additional lengths of netting may be added together using the connectors attached to the ends of the nets. (See picture below).

11. Undulating Ground.
Where you want to erect a net on an undulating surface, remove the posts from the net and stretch it out between the corner posts. Start by positioning posts in the highest and lowest points of the surface. Position the remaining posts along the net to lift the second wire off the ground. If the ground is so undulating that the posts are insufficient to train the net to follow the terrain, in that case remove those posts in the hollows and replace with pegs to pull the net down to the ground. These posts may then be used where best suited. In serious cases it may be necessary to purchase additional posts.
12. Netting Requirements
Electric Nets are very resource hungry and not all energisers are capable of running an electric net. All our energisers have a table that will indicate how many standard 50 meter nets of 1 meter height. Where possible, place the energiser in the centre of the fence so the current flows both ways but this is not critical.. The HotShock or Farmer range will give the best combination for fox protection as they run at higher voltages than standard energisers and will better control. Standard energisers will however be successful in their own right. Only connect one energizer per fence. The best place to connect to a net is at the clamp on the ends of the net. Why is Electric Netting more resource hungry?
13. Dismantling a Net.
When dismantling the net, collect up all the stakes together allowing the net to fold down between the posts. These are then used to roll the net onto. Do not try and roll the net up from one end, it will be a mess and take ages to roll up.
14. Fault finding on a Net.
- Test just the energiser by itself as outlined in this troubleshooting page. If the voltage is 6000v or higher on the energiser then logically the problem is in the net.
- If the energiser is OK then it is a matter of scrutinizing the fence to find where energy is being lost.
- If you have more than one net then disconnect those furthest away to make sure that closest is OK - if that is OK then you know it will be in one further away. Re-attach one at a time until you find the problem.
- The most common problem is that the lowest 'hot' strand has been caught around one of the metal spikes on the posts and is shorting it out.
- The net must be at least 2" away from anything metal (metal posts, existing fences, spikes on support posts).
- On Poultry Nets, the bottom hot wire can slip off of the plastic portion of the end posts and get caught onto the metal spikes. This will cause a dead short and no energy will be on the fence. Unhook the energizer and slide the hot wire back onto the plastic post.
- Hook energizer back to the net and test.
- Make sure the Energiser has sufficient capacity to run the number of nets attached to it.
Tips for setup:
- A length of rope is useful to mark out your proposed placing before starting.
- Lay the net out before trying to place it as it is a cumbersome thing to manoeuvre.
- Mow, or if you have time (7-21 days depending on brand) apply a weed-killer to a 12 in wide strip where the net will sit – weeds etc will cause rapid power drainage and reduce the effectiveness of the net.
- Velcro tie wraps are ideal to secure the two ends of the net to make a gateway that is easily secured and opened.
- If the soil is dry, wet the ground before inserting the earth stake to provide better contact.
- When erecting, two people are best to hold either end to tighten the net while a third inserts the stakes.
- Invest in a circuit checker to ensure your fence is always at maximum power.
- If you must, a blade of grass held between the thumb and forefinger and touched against the net will give you a (gentle) indication that the fence is working.
- Read all of the manufacturer’s installation precautions.
- If the fence can be touched by visitors to your property, ensure the correct warning signs are on display.
- Check the net daily for breaks – rabbits will chew through the strands if the power is off.
Featured