You have no items in your shopping cart.
Guide to Installing an Electric Fence
AN ELECTRIC FENCE IS ONLY AS STRONG AS ITS WEAKEST LINK SO ATTENTION TO DETAIL IS MORE IMPORTANT THAN HOW THE FENCE IS INSTALLED.
When you have chosen the equipment required for the application planned, installing electric fencing is not difficult and there are a few simple but critical areas to keep in mind. Electric fences are not designed to be robust impenetrable barriers but instead rely upon animals changing their behavior as a result of receiving an electric shock.- Rule 1. Make sure that the conductor (current-carrying rope, tape or wire) touches ONLY plastic - nothing else. Not wood, metal, vegetation or concrete - Isolate it totally.
- Rule 2. Make sure you have an efficient earth to return the current back to the energizer when the animal touches the conductor.
- Rule 3. Train the target animal to respect the fence
And that is it. Follow those three simple rules and your fence will deliver the "sting" you are looking for.
Common Mistakes that people Make
Installation
1/. The first step is to locate all of your corner post, gate posts and end posts.
2/. Install all corner and end posts, but do not install the bracing just yet. Do not install your in-line gate posts yet.
3/. You now need a guide wire or rope to establish a good straight fence line. Since we are going to install a rope fence system we recommend that you use rope for your guide wire. It will later be used as your bottom rope. Take some time to stretch your guide wire - i.e. snap it up and down and get it tight and straight. If you have a rise in the lay of the land, go to that point and make sure that you have a straight line going over the rise.
4/. Once you have a guide wire all the way around you can locate any in-line gate posts, knowing that they are in a straight line with the fence.
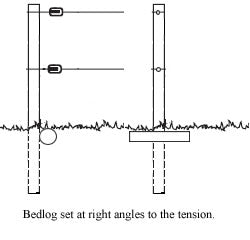
5/. You can now install your bracing to your corner posts and gate posts. With the guide wire tight you can line your bracing up so that the ropes are all straight. Corner and end posts should always be wood, metal or concrete. Plastic horse posts are not intended for corners and do not have the strength to withstand tension in the fence. Corner Posts are the base of the fence and are placed where the straight-line fence has to be bent, either at the end of a fence, at corners or where the fence takes an alteration in direction. As the electric wires do not need to be strained as tightly as a plain or barbed wire fence, the posts do not have to be as substantial as conventional wire fences. A simple post in the ground with a bed-log laid just below ground level and at right angles to the tension will be sufficient for most situations. Should the ground be particularly boggy or multiple, highly strung wires are planned then the more substantial "H" configuration is very stable. Suitable insulators are attached at the required intervals.


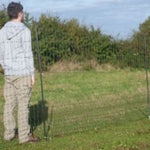
6/. The next step will be to install your line posts. The Ultimate Plastic posts can usually be pushed in with a foot on the strengthened footplate. The distance between posts is entirely at your discretion. The further apart they are the more the conductor wire will sag and if it is a tape, the more it will flap in the wind. It is better to place the posts so that the line will follow the topography of the ground, ie; in the hollows and highest points. A 5 to 10m interval between posts is fine. The in-line posts may be either wooden posts with suitable insulators attached or plastic horse posts pressed into the ground.
7/. Now, you will have all your corner, end, gate posts and line posts installed. So you are about ready to stretch your rope.
8/. Mark all your posts, indicating the location of your strands of rope. It is quite simple to take an old yard stick or something similar to use as a template. This will assure that your rope is equally spaced thru-out your system.
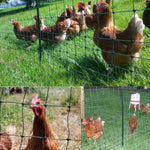
9/. Corner insulators are now installed at the heights required. The conductors need to be aimed at the animals' most sensitive organ, the one they use the most to investigate unusual objects - that is the nose. It is wet, very sensitive and the majority of animals use it to test out un-known features. The nose-height of the resting target animal dictates the positioning of the first line. The second line should be sited in a position so that if the animal crouched to get under the first line it will again get the nose or the top of the legs if a horse is using a blanket to insulate it from the top line. If there are animals of different height then you must cater for both, ie; a Shetland and a Thoroughbred in the same field. There is a picture at the end of this article showing average heights. These may be adjusted to suite your own requirements. When all the lines are installed make sure all are connected together at both ends of the fence and if possible a couple of places in between. Other lines may then be placed where you feel the threat of penetration may occur.
10/. If using wood or steel corners, you will now mark the locations of your end strain insulators that you will attach your rope to. You may use either rope or hi-tensile wire to attach the end insulator to the end and corner posts.
11/. Now you are ready to start attaching and tensioning your rope to the posts. Attach one end to the end insulator, looping it thru the insulator, and then use a rope clamp to secure it. Using a broomstick or dowel though the center of the reel, walk the rope to the other end reeling out the rope behind you. Attach your rope around the other end post and tension your rope - do not over tension. After you have achieved adequate tension, secure the rope with a clamp. Make sure to use proper joins and tight connections throughout.
12/. Now you are ready to attach the rope to all the line and brace posts. Allow the rope to "settle in" for about 24 hours, and then re-tension the rope.
13/. Install all jumper wires to transfer power from each leg of fence to the next. Joining Polytape is only correct by employing Tape connectors. These will maintain the shape of the tape as well as ensure there is a good connection for the transmission of electricity. Polyrope and twine may be joined neatly by using Wire & Rope connectors or tying a knot as shown in the illustration. When simply tying a knot, it is imperative that the filaments are bared and twisted together to optimise the connection. Wire should be joined using a knot that maximises the contact area between the incoming and out-going wire. Reef knot or a figure-of-eight knot provide good contact and then wind the ends around it self as shown in the diagrams.

15/ The fence may terminate at any point, the fence does not have to create a circuit. The fence is essentially two arms of an open circuit, the fence itself and the ground. The electrical circuit is completed when the animal touches both the fence and the ground.
The Electric Fence Energiser
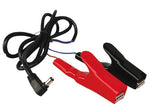
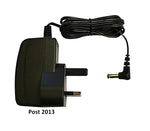
Find a suitable location for your electric fence energiser. For a mains unit this can be under an overhang or inside your basement or garage within easy reach of a 220v power source. 12v and 9v battery units should be sited away from and protected from animal traffic so that it is not damaged. Solar units MUST be well protected as they are very fragile. Attach the electric fence energiser to the wall, but do not plug it in yet. All energisers are supplied with installation directions.

The Earth/Grounding Rod
To ensure your fence is working properly an effective earth system is essential. The earth system must be efficient enough to allow unrestricted current flow if the animal is to feel a shock. One earth/grounding rod will need to be installed within a reasonable distance of the electric fence energiser - preferably into moist soil. Under the eaves of a building, leaking tap or in a stream bed is great. The length of the earth rod is determined by the fences' maximum distance from the energiser and the joule rating of the unit. There is always a chemical reaction taking place between soil and metal thus the greater the surface area between the earth stake and soil - the better. Rust is not an efficient conductor so a rusty stake will not be as effective as a galvanized stake or even better, a copper rod. If in doubt put in an extra stake, you cannot go wrong. Run a High Voltage wire from the energiser to the earth rod and secure the wire to the rod. For the best grounding system, install two or more earth rods spaced 3 meters apart preferably into permanently wet soil. Link these rods together with the HV Wire as well. The earthing system is an integral and critical part of your energisers' performance and poor earthing accounts for the majority of problems.
Connect the Energiser.
Now that the fence is erected, make your connection from the electric fence energiser to all the wires of the electric fence. Once your connections are made, go back and re-check all of your connections along the fence. Do this before attaching the power source. When you are finished, connect the energiser to the power source, either mains or battery. There should be a light on the controller that will light up to notify you that the fence is working properly.
Once your installation is complete and the fence is electrified, use a voltmeter to check voltage along the length of the fence to ensure the electric is flowing the entire length. Hang the tester on the fence and push the metal rod on the end of the rats tail into the ground. For horses normally 5KV or 5000 volts may be adequate but go for higher if woolly breeds and if vegetation is likely to be an issue. Sure an animal may be controlled by 2-3000volts but IF there is ANY impediment there will be no fat in the system to overcome a minor problem.
Vegetation Problems
1/. Vegetation touching the fence will also complete the loop causing the output voltage of the energizer to drop. It is very important, therefore to keep any growth on the fence line to minimum to ensure the animal receives the maximum shock available. Larger, better quality energizers will burn off a fair amount of casual vegetation and assist in maintaining a good fence, but this should not be counted on to maintain your fence.
2/. Many animals keep a fence line remarkably clean grazing beneath the wire. Vegetation may be controlled by the use of a strimmer. Should this not be feasible, vegetation may be burned off by a propane gas burner or a broad-spectrum herbicide (ie; Glyphosate) may be employed and sprayed in a band under the wire.
Electric Fence Gates.
1/. Electrified gates should only be connected to the source of electricity by the hook side of the apparatus. When the gate hook is disconnected from the gate post, this then makes the gate safe and not electrified. Should it then touch the horse as it is going through, it will not be affected. If the gate drags on the ground it will not drain energy from the fence.
2/. DO NOT use the gate itself to transmit power from one side of the gate to the rest of the fence. The gate hook has a very poor connection where it is hooked over the gate insulator that will reduce the power to the rest of the fence. (Remember the weakest link in the chain.) Rather use an Underground High Voltage Insulated Cable to transmit the maximum amount of energy to the rest of the fence. Also the rest of the fence will be disconnected when the gate is open. Rather use an underground cable between posts.
3/. Use a Gate insulator to connect to the fence and the gate handle will hook into the other loop. The spring or chord may be attached to a ring insulator screwed into the opposite gatepost but not connected to the rest of the fence.

It is possible to electrify a wooden or metal gate by stringing a length of wire between two insulators. This wire is then connected to the rest of the fence by a loose length of insulated High Voltage cable that is long enough to allow the gate to open without snagging. This may be seen in the diagram below.

Electric Fence Training
Animals that are unaccustomed to electric fencing may need to be made aware that this fence is different to others. Domestic animals will normally need little training and simply being released into the paddock as far away from the fence as possible so that they will gently acquaint themselves with the fence. Training is more important with un-domesticated animals and in particular Deer who tend to jump over the obstacle without investigating it or domestic animals where the fence requires re-enforcing. This can be done by a range of methods;-
- 1/. Placing feed close to the wire. (Not very effective)
- 2/. Fencing off a small area and introducing the animal there. Time consuming and only suitable for domestic stock.
- 3/. Attaching thin strips of kitchen foil to the fence. These wave in the wind and attract the animal to investigate them. (Particularly good for birds, poultry, Ostriches and Rhea)
- 4/. Bait the wire. This works extremely well using Bait Caps and involves applying an attractant to the wire for the initial period. Molasses or treacle is ideal for badger, horses, sheep and goats. Peanut butter works with badger, deer and rabbits. Foxes, hyena and jackal respond to some lard smeared on the wire that has proved effective
This sounds harsh, but is VERY effective and after the first few animals get a sting the rest will learn from their experiences, termed "Socially Conditioned Avoidance," and the fence will be left alone. The bait may be removed after about a week.
I hope that this helps you understand the basic planning and installation process of rope fence.
Other than the equipment needed to install the end and corner posts you will need only a limited number of hand tools such as: pliers, hammer, screwdrivers, marking pencils, etc.
Happy fencing! And, by all means, please feel free to call us anytime with any questions or comments.
Additional reading is available from;-
The Sustainable Farming Connection website.
Badger Fencing;- The Effectiveness of EF for Badger control. and Types of fencing suitable for badgers.
Rabbit Fencing Types of fencing suitable for Rabbits.
Featured